What is stripe checkout in ionic 3?
First, let’s know about the stripe. The stripe is a standard online payment platform. We can say it is a payment gateway which helps us to take a payment from the user and delivers it to the merchant in a secure way. In a simple word, we can say it is a gate through which the payment can be transferred between the user and the merchant.
Now let’s talk about stripe checkout. It is to collect the payment data constantly by remembering some payment details of the user. It accepts the payment securely from the user and passes it to the server directly
Why are we using stripe checkout in ionic 3?
Of course, we smarty developers use the things which are reliable and secure. Agree…? So same with stripe because it is,
- Secure and safe
- Complete payment gateway
- Powerful and flexible to use
- Faster and more efficient
- Scaled payment management
Step 1: Stripe Setup:
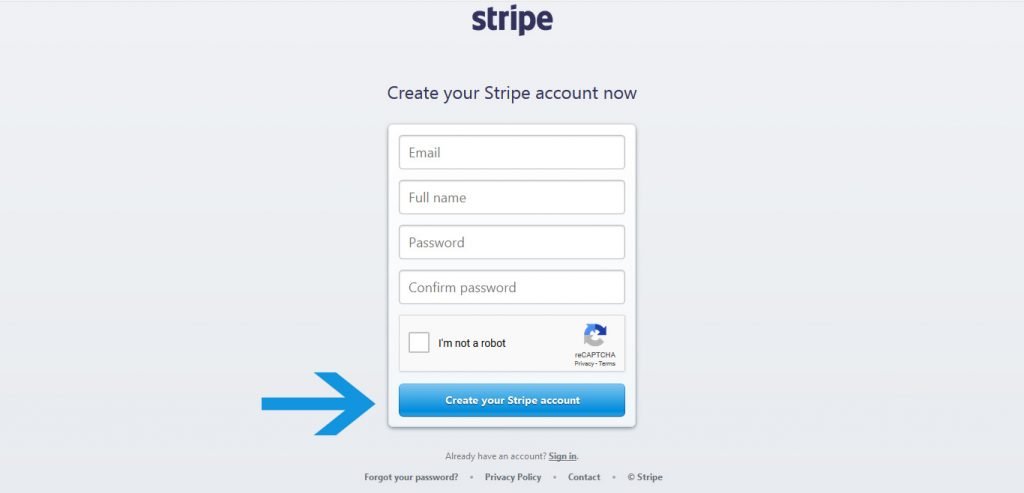
Go to stripe and register yourself here.

After verifying your email. Do login in the stripe. After this, you will see the below screen then click on ‘Use stripe API’ button.

Then the dashboard will appear on your screen. Copy ‘Publishable key’ and ‘Secret key’ from there and keep both keys with you for further use.

So our stripe set up is done. Now let’s move on the second step of stripe checkout in ionic 3 application.
Step 2: Code implementation
Now let’s begin. Open a command line and open our project.
cd stripeCheckout-ionic
Here I want to tell you one thing, we will use the checkout feature of the stripe. We can implement the stripe payment process in two way.
First way:
You can give the whole authority to stripe. Like, it will handle everything from securely collecting the payment information from the user to transfer payment to the merchant also in a secure way.
Second way:
In this second way, we allow stripe to transfer the data we have given it via API call. It means we have full authority to handle the payment process. Like we will gather the payment data and will call stripe API. If it will be successful then we will get success token in response. After that, again we will call stripe API to pass that successful payment information to the merchant to capture payment.
Here we are going to use the first process means, we are giving the full authority to stripe to handle our payment process. This process simply called as ‘Stripe Checkout’. In this process, the stripe will accept the payment information from the customer and it will give us a secure payment token which we will pass to the server. I hope you’re cleared with the implementation flow.
So open your index.html file and import the below js library in it.
<script src="https://checkout.stripe.com/checkout.js"></script>
Then declare the global variable to use this js library in your project. Open your cordova-typings.d.ts file and add,
Declare var StripeCheckout;
Now let’s prepare the view first. We will define one payment button which will call the js function in the background. This will automatically handle the authorization and the payment process. We will get the secure token in response. So open your src/pages/home/home.html file and define one button.
<ion-content padding>
  <button (click)="payButtonClickHandler()">Pay</button>
</ion-content>
By clicking this button, we will call a function ‘payButtonClickHandler()’.
Now open your src/pages/home/home.ts file. Here we will configure the stripe and will catch its different events. Let’s see how.
Configure your stripe after the view is loaded. So do as below,
ionViewDidLoad(){
  setTimeout(() => {
    this.handler =  StripeCheckout.configure({
      key: 'YOUR_STRIPE_KEY',
      image: 'https://stripe.com/img/documentation/checkout/marketplace.png', // Picture you want to show in pop up
      locale: 'auto',
      token: token => {

        // Handle Stripe response
        let alert=this.alertCtrl.create({
          title: 'Response from Stripe',
          message: JSON.stringify(token),
          buttons:['ok']
        });
          alert.present();
      }
    })
  }, 1000)
}
Here you need to provide,
Key: Stripe ‘Publishable key’ which we got during the stripe set-up.
Image: The picture we want to show in the pop-up screen of the stripe. The picture can be of your application too.
Locale: Here you can define the language of your modal. By default language is English. You can choose it from here.
Amount: Amount you want to display in the pop-up button.
Token: It is a function to handle the default method of the stripe which returns a secure token. You can pass this token to your server from here.
Let’s make a function which we defined named as ‘payButtonClickHandler()’.
payButtonClickHandler(){
    this.handlerOpen();  // To open your stripe pop-up
}
Now we will define the pop-up handler method.
handlerOpen(){
    this.handler.open({
      name: 'Test App name', // Pass your application name
      amount: 100, // Pass your billing amount
    });
}
Here in this method, you need to define the application name and amount to display.
Now, let’s handle the pop-up closing event as well.
@HostListener('window:popstate')
  onPopstate() {
    this.handler.close(); // To close the pop-up
  }
Our coding part is done. Now let’s run the stripe checkout into a device or simulator. Open your command line and fire below commands,
For ios:
Ionic cordova run ios
For android:
ionic cordova run android
So guys, these were all about the implementation of stripe checkout in ionic 3 application. I hope it is running well to your side too. Let’s discuss the configuration options to change the look and behave of stripe pop-up.
Configuration options of stripe checkout in ionic:
Some configuration options we discussed above. Apart from those options, the other options are like,
description: The brief explanation about the bill or product.
zipCode: To verify and validate the billing with a zip code of a user.
billingAddress: To collect the address of a user in the billing process.
currency: The currency of amount.
email: To prefill email section because we already know the email address of our application user.
shippingAddress: The shipping address of the product.
allowRememberMe: To save user payment information for future use. If the user will allow then one’s data will be stored in a cookie. That is possible if the user doesn’t set certain privacy settings.
Now let’s discuss the simple but commonly faced issue by many developers.
Commonly faced issue of stripe checkout in ionic 3:
1.Error:
- Pop-up is not opening in device or simulator.
- Stipe checkout window is not opening.
- Stipe checkout window disappears within a few seconds.
Solution: The stripe checkout pop-up is not opening because it is not permitted to open. So we need to give permission to open the external URL in native. To resolve this issue, we need to add the URL in the config.xml file. There are two ways to permit the external URL, either allow all external URL or allow specific one.
To allow all url:
<allow-navigation href=”http://*/*” />
<allow-navigation href=”https://*/*” />
To allow specific url:
<allow-navigation href=”https://checkout.stripe.com/*” />
You can find source code on Github.
Testing Stripe Card Details
https://stripe.com/docs/testing
I hope this tutorial would become helpful to you. Your valuable comments and sharing views always inspire me. Keep sharing your knowledge with us. Thank you. See you in the next tutorial.


